Subscribe to Penguin-man the computer guy

Wednesday, June 12, 2013

Hack to get Mouse to Work Acer Aspire One 722 and Linux Mint

After dual booting my Acer Aspire One 722 netbook with Ubuntu 13.04 and Linux Mint 14, I found that my mouse did not completely work on boot up in Mint. This was problematic for me. I wanted to learn Linux Mint and after a little work on google, I found this work around work around... two terminal commands that completely fixed the problem:

      sudo modprobe -r psmouse 

      sudo modprobe psmouse proto=imps

This was a fine work around, except that I hated having to try to launch the terminal and run these commands with a half crippled mouse. Even cntr-shift-T did not launch the terminal making me believe that the keyboard might not have been fully functional either.
Acer Aspire One 722 netbook
Because of this problem, I wanted to find a workaround to this problem. I knew that if I could put these commands in a file that was run during boot, that this problem would be fixed. After several hours of Googling, I figured out that I could place these commands in the/etc/rc.local file. I found out that the commands placed in this file are run as root at the end of the boot sequence. In order to open up this file run the following command:

        sudo gedit /etc/rc.local

Once this command is run (As can be seen in the below screenshot) then we can edit the file located in /etc/rc.local.

Screenshot of the Terminal opening the /etc/rc.local configuration file as root


The /etc/rc.local file after modification

Wednesday, June 5, 2013

My First Impressions of Ubuntu 13.04 on an Acer Aspire 722

I have been an Ubuntu fan for several years now... my first Ubuntu system was a dual booted Ubuntu 10.04/Windows 7 system. After starting to use Ubuntu, I will never forget the increase in speed that I experienced compared to using a Windows system. Ubuntu was sooooo fast!!!

Well several releases later, Ubuntu has been getting heavier... it has been getting almost too slow to run effectively on my Acer Aspire One 722 netbook. I like having a lightweight netbook to carry around. They are portable, and flexible.
Acer Aspire One 722 netbook
Because of the trend that each release is heavier than the last, I was rather hesitant to upgrade. Tonight I decided to upgrade my machine. I was very impressed with how much faster 13.04 is then 12.10. I also noticed that the icon for the nautilus file manager icon was changed to this icon:
From the older Nautilus icon:
The icon I am indifferent to, but the speed that nautilus launches is so much faster now. This is a welcomed improvement. The HUD also has a new icon.

Updating to 13.04 from Ubuntu 12.04 or 12.10


 In Ubuntu, to do this I ran this in the terminal:

sudo apt-get update && sudo do-release-upgrade

After running this, expect to settle in for a while. Pop a movie in or something, the system does not need to be babysat but it does not take a lot of effort or experience. Put a movie in and put the computer on your lap. You will be prompted on occasion. When done restart your computer and enjoy Ubuntu 13.04. I think my system took about 90 min before being ready to restart.

My Acer Aspire One 722 desktop just after update to Ubuntu 13.04

Friday, May 31, 2013

Getting to Know the Linux Terminal and BASH

In my first post on Linux Commands, I gave a bunch of examples on various commands but I didn't really give much background about the Terminal, the terminal environment, and the scripting language. Today when we say we are using Linux Commands most people in the field will understand that we are referring to a specific kind of scripting language that works on UNIX-like environments; specifically, this usually means BASH commands and scripts. But what is BASH, a terminal, or a terminal emulator?

In short we should get a few basics straight. Geeks are sloppy so when we say terminal we usually mean terminal emulator. When we use the terminal, the commands we type are in BASH. BASH is a far which is a far more powerful language than DOS for Windows. Because BASH is a language, we can use it to make small programs and run them from a file.

Meet the friendly Gnome-terminal :)

The Terminal 

A terminal emulator is a program that you can use to interact with the operating system. The terminal uses text based commands and can read files to allow it to control the operating system. When using a terminal, remember that it goes by several different names including these names:
Terminal
Command Line
Command Prompt

In Ubuntu if you are running the Unity desktop (Default GUI for Ubuntu 11.10 and beyond I believe) the way to access the terminal for the first time is from the Heads Up Display (HUD). To access the HUD, press the Win key or clicking on the HUD icon with the mouse:
HUD icon button at top right had side of Unity Desktop
Once the HUD launcher opens type the name of the application in the command line; here we type "terminal". Notice that it is unnecessary to type the entire name.


Click on the terminal application. This will give you the default GNOME Terminal. Once you are using the default terminal, if you right click on the terminal icon you can lock it to the launcher... do this, if you are serious about Linux you will use the terminal all the time. Note, as seen in the picture below, if you right click on the top bar of the terminal you have more options.

Is the gnome terminal the only terminal available in Ubuntu? No, there is xterm and there is terminator; xterm is used in some light weight set ups. My preference is either the gnome terminal or terminator. I actually like terminator a lot and terminator has many more features than gnome terminal. One of these features is seen below:
Terminator can be split to show several terminals at once.
Terminal's window can be split into many segments that are each there own terminal. I do enough stuff on the terminal that this is useful at times. Of course the Gnome terminal allows tabs, but terminals split feature is far more useful. To install the Terminator terminal emulator run the following in a terminal:

sudo add-apt-repository ppa:gnome-terminator
sudo apt-get update
sudo apt-get install terminator
For more information about terminator I like this article and the terminator home page. I have not used a Mac machine yet, but they too are UNIX based so you can install terminator on a Mac too.

        fink install terminator

Terminals vs. Terminal Emulators

A terminal emulator is a GUI based application; a terminal is the screen of an OS when the the GUI is not running. As we said above, geeks are often sloppy in how they talk and say run <x> in the terminal instead of being correct and saying  run <x> in the terminal emulator; so when we say terminal we usually mean terminal emulator and assume you understand. Because many servers don't have any GUI at all, we often use the "real" terminal in them, and using a terminal is much like a terminal emulator. If you are running Ubuntu, to leave the GUI and see a terminal use the keyboard shortcut cntr-alt-F1, F2, F3, F4, F5, or F6 and to return to the GUI run cntr-alt-F7. Fun, huh? It is actually a great way to rescue a crashed GUI.

BASH

Once you feel comfortable around the actual terminal itself, it is time to meet BASH. Bash is a Unix shell that was developed by the GNU project. The BASH shell replaces the Bourne Shell which in turn replaced the Thompson shell. The Bourne shell was developed in 1977 and BASH was released in June 1989. The Thompson shell that Bourne replaced was written by Ken Thompson in 1971. If your starting to realize that the BASH tradition goes back a ways, your right... it does!!! There is a ton of documentation online and I will not try to repeat that.

BASH syntax is pretty easy... the general syntax is:
        command [arguments] <file>

BASH has a few simple commands everyone should know... here are my basics
To list files, run ls:

        ls
        ls -l
        ls -a
To change directories, run cd:

     cd /media/flashdrive/anime
To change directories to home, run cd ~

    cd ~
To change directories to root, run cd /

     cd /

To change directories back one directory (towards root) run ..

     $..
To update your Ubuntu or Debian based system run:

     sudo apt-get update 
     sudo apt-get upgrade 

Or run this which does both...

    sudo apt-get update && sudo apt-get upgrade 

Thursday, May 23, 2013

Examining Objects and Virtually Modeling Them With Object Oriented Programming

Some of the most obvious ideas in the universe are also the most abstract, and it seems like the definition of a certain type of object is just such an abstract concept. Lets imagine for a moment that you see a bowl or a plate. You immediately recognize the object and place it in a category, the plate category say. If asked why you believed that the object in question was a plate, you may have some difficulty in explaining why you felt it was a plate.

Some time ago, after coming into contact with the idea of object oriented programming I began to wonder about what a real object was. This led me on the journey that I here attempt to take you on. The philosophical idea in question is 'what is an object?' This is actually a problematic question; I asked my friend and philosopher, Mr. Rodney Chlebek, this question, and in response he wrote quite an interesting post in which he argues that their are no objects bigger than particles. In an esoteric way I certainly might agree, although I definitely am not enough of a philosopher to have a very educated response there. That said, I do believe that objects do exist in a sense that Chlebek is not examining. I am not per se disagreeing, actually I am extending his argument. I believe that objects, like bowls and plates, exist in a special virtual world of cognition where an object is nothing more than an instance of a class. In this virtual world, objects exist in the brains of humans as well as in the computers we create. Let's examine this claim more deeply... 
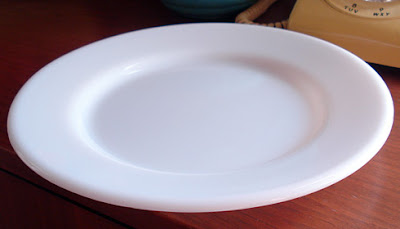
Does this plate really exist? How do I know it is a plate?
To be clear, I might as well define our terms: In this article, we will call these categories that we recognize objects by as classes, and an individual example example of a certain class we call an instance of that class. These terms are obviously borrowed from computer science, and we use them in order to be able to better understand the similarity between the "real objects" that we encounter every day, and the "virtual objects" we encounter in software. Of course, if you follow Chlebek's thinking, and my extension of his thought described above, this distinction is totally artificial. The plate or bowl we earlier spoke about, you recognized not as simply a discrete object, but as a member of a larger category. Of course, you may have placed the plate into more than one category.
Lets use the "real" plate object again and describe it with the new vocabulary we just introduced: The specific object you hold and call a 'plate' is an object that is an instance of the plate class, yet it also belongs in the table-setting class, the kitchen class, and the pottery, glass or metal class depending on its construction. What is fascinating is that it seemingly takes little intelligence or insight to arrive at these conclusions, despite the fact that in these cognitive processed are ideas of class inheritance, and other equally interesting and abstract ideas.

Object oriented programming is a great allegory for thinking about things, or like I said above, if it is taken like Chlebek and I have stated, maybe the allegory IS reality. I know that speaking of psychology and philosophy at this junction may be quite bizarre, but object oriented programming and the cognitive phenomena of objects are really on this fine line between philosophy, psychology, and computer science.  In keeping with the ideas in object oriented programming, I believe that a class of objects is a collection of distinct entities that share a certain defined set of attributes and actions or purposes. What are attributes and actions as I am using the words?

To me an attribute is some characteristic part of an object. I may be a curve, a bump, some physical property, or dimension or ratio of dimensions.

In contrast to an attribute, an action is some distinct purpose that the object has or some motion it makes or work it performs. A plate holds food, and that is the action for which we most often purchase a plate. A car makes motions that enable us to move between isolated points. This too is an important action.

This definition is broad enough to work for both "real" objects and the "virtual" objects that we build in object oriented programming. Real objects have both attributes and actions, as do virtual objects. Since we are speaking of object oriented programming, lets see how this works in pseudo code, and then move on to real code. In object oriented programming, we identify instances of an object of a class as having data members and functions or methods. In general, the data members are variables of some data type, and these are analogous to the attributes we discuss above. The functions of our class take these data members and attributes and perform actions with them. This means
   class Some_Object
   {
        Attributes;    // Think "Data members" (variables)
        Actions;       // Think "Member Functions"(Methods)
   }
Notice that a class includes fixed data and actions that the data does. These actions are an important part of an object. For example, a plate has data members that define its shape, its size, and its material; it also has functions, like the ability to hold food, to be carried without breaking in half, and to hold some liquid. A bowl might then be thought of as a subclass of plate, but with the additional function of holding soup. But what is a subclass? A subclass is a class of objects that contain all the attributes and actions of the parent class, and and then add to that some specific attributes and actions of their own. Thus the idea of class inheritance comes into our vocabulary. Lets examine classes and inheritance by building a plate and a bowl class:
   class Plate
   {
        //Attributes ("Data members")
          plate_shape;
          size_xAxis;
          size_yAxis;
          size_zAxis;
          plate_material;

        //Actions ("Functions")
          carry_food();
          stength();
   }
The above class is a definition for a plate class, and in C++, we would save this file as a *.h file. Lets call it  "class_Plate.h". Of course, a source file would include this .h file and would take these data members and functions defined in  "class_Plate.h" and would flesh each out. Below is class_Bowl.h that defines our bowl class; note how the first line includes the plate class, so that every bowl object is an expanded plate object.
   class Bowl
   {
        //Attributes ("Data members")
          bowl_depth;

        //Actions ("Functions")
          carry_soup();
   }
Note how simple this class is because it already has many of its attributes and functions declared in the parent class class plates? This is important, to note that since it inherited much, little additional needs to be defined. Really the only thing new is carry_soup(). bowl_depth really is not needed; if I altered the size_zAxis to a larger variable, then I would be able to define the bowl depth. The simplicity of the inherited class Bowl should not surprise us, as an inherited class is a subset of some super class of generic objects.
All these objects are members of class Plates, and only the varying of a few attributes (data members) makes the variety of objects and shapes seen. Of course the subset that are part of class bowl add the action (function) carry_Soup() that gives them an added utility that the plate class super set of objects lacks. Note how we say an object is matching to another object when both are not only instances of the same class, but also when they share the same values of their attributes. 
I think the above pseudo code and pictures should be enough to convince you that real and virtual objects share much of the same characteristics. An engineers blueprint could be thought of as the definition for a new class or instance of a class; the dimensions are the values of various attributes of the class, and the proximity and interactions of various attributes define the functions of the class.

Using Objects in the C++ Language

Why you ask though would I want to make a virtual object through object oriented programming? Well, the reasons are diverse, but maybe I need to store multiple definitions of an employee, a box, or some other thing. Using OOP, I can make this into an object. In programming, this object is a new data type, and is sometimes called an abstract data type. In order to understand classes better, lets define a box class in some detail now. Below is the code for the C++ header file for a box class:
#ifndef Box_Class
#define Box_Class

        #include <iomanip>      
        #include <iostream>
        using namespace std;

        class box
        {
                private:
                        string type;
                        int length;
                        int width;
                        int height;
                        int box_volume;
                
                public:
                      void output_value();
                      int volume();
                      string units(int);
                      float volume_units(int);
                      void input_variables();      
        };
#endif 
Notice the simplicity of this declaration; aside from the statements preceded by # signs (preprocessor directives) which are not necessary to understand the concept, this is a simple class. I left the preprocessor directives in the file in order to allow you to copy this code and run it if you chose to. If you copy it, name it "box_class.h" so that when I later show how to compile it, you can follow along. If you want to download the code, the links to these files is at the end of the document. To see how these functions are implemented, here is the source file that defines the functions declared above. A header file and an implementation or source file together make up a class.
        #include "box_class.h"
        #include       
        #include 
        using namespace std;

                      void box::output_value()
                      {
                        cout<< "The box is a " << type << " type box,the length is " << length;
                        cout<< " inches, the width are " << width;
                        cout << " inches, and the height is " << height << " inches." << endl;
                      }


                      int box::volume()
                      {
                        int volume_inches;
                        volume_inches = length * width * height;
                      return volume_inches;
                      }        


                      string box::units(int volume_inches)
                      {
                        string units;

                                if(volume_inches > 1728) {units = "feet";}
                                
                                else units = "inches";
                      return units;  
                      }


                      float box::volume_units(int volume_inches)
                      {
                        int volume_inch;
                        float volume;
                        volume_inches = length * width * height;

                                if(volume_inch > 1728) 
                                {
                                  volume = (float)volume_inches/1728; 
                                }                                             
                                
                                else 
                                {
                                  volume = volume_inch; 
                                }
                      return volume;
                      }        


                      void box::input_variables()
                      {
                         cout<< "What type is this box?" << endl;
                         cin>> type;

                         cout<< "What size is the length?" << endl;
                         cin>> length;

                         cout<< "What size is the width" << endl;
                         cin>> width;

                         cout<< "What size is the height" << endl;
                         cin>> height;
                      }
Notice that preceding every function is the box:: syntax. This tells the compiler that this function is part of class box. If you want to compile this project, open your favorite text editor and save this as "source_Box_class.cpp". My favorite text editor is  gedit, an open source text editor that works in Linux, Windows, and Mac. Gedit is a project of gnome.org, an organization that promotes free software and makes the Gnome GUI for Linux. To get gedit on an Ubuntu Linux machine run the following in the terminal:
sudo apt-get install gedit
Once gedit is installed you may want to configure the gedit plugins that are useful to programmers. One  of my favorites is word completion... I think it really helps speed up my programming and make it more accurate. To install them on Ubuntu, type  the following in the terminal:
sudo apt-get install gedit-plugins
Now that we have a good text editor, open it and copy and paste the above code into two files, and name them "box_class.h" and "source_Box_class.cpp" respectively. Save them in the same directory (folder). Now that we have a complete class, we can include it into any main function or program we want. To do this, simply add this line to the top of the main() function:
    #include "box_class.h"
The quotes tell the compiler to look in the same directory as the main() for the .h file. Below is an example of a very simple main() that makes an array of boxes and lets you define values of their variables (attributes). It then displays the values of the attributes and the volume calculated by the class. Here is the code; name it "main_classBox.cpp":
        #include "box_class.h"
        #include 
        using namespace std;
        void input_value();

                  string type;
                  int length;
                  int width;
                  int height;
        
        int main()
        {
                int size;
                cout << "How many times do you want to run this" << endl;
                cin >> size;

                int volume[size];
                box this_box[size];

                // Must not be (i <= size) or else size =2, and loop iterates 3x
                for( int i = 0; i < size; i++) 
                {
                        this_box[i].input_variables();  
                        this_box[i].output_value();
                        volume[i] = this_box[i].volume();
                                cout<< "The box has a volume of " << std::setprecision(3) << this_box[i].volume_units(volume[i]);
                                cout<< " cubic " << this_box[i].units(volume[i]) << " ." << endl;
                   }
          return 0;
        }
Once this main() is saved, we can compile. I use the gcc/g++ compiler developed by the GNU project. This compiler can be installed in Ubuntu by installing the build-essential package:
sudo apt-get install build-essential
Once build-essential is installed, we can compile our program. To do this, run the following:
g++ main_classBox.cpp source_Box_class.cpp -o boxClass.exe
This will create an executable program named boxClass.exe. To run our program type the following in the terminal:
./boxClass.exe
After running this command, you should see something similar to the following:
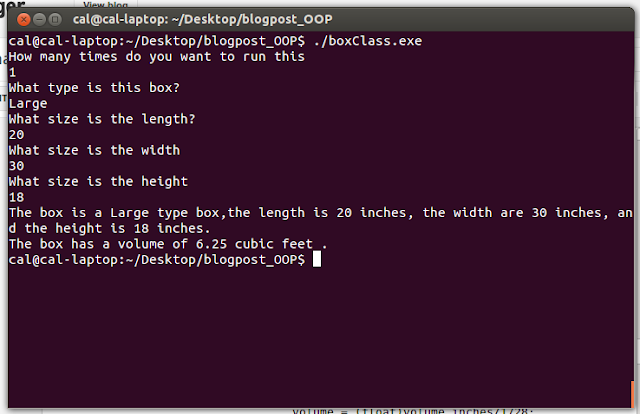
Running the box class program in terminal after compilation.

Conclusion

Making a virtual object is a useful technique in a programming language that supports object oriented programming. By understanding it as a way of seeing familiar objects, one can better analyse the real world and can be better able to use OOP as a method.

Links:

My Homepage
Page on my Website dedicated to hosting the files for this post
main_classBox.cpp
source_Box_class.cpp
box_class.h

All of the above are available under the GPL-3.0 licence by the author. Please contact me for permission if this code will be used for other than not for profit educational reasons. Do not republish without permission.

Saturday, May 18, 2013

Dennis Richie- A Personal Hero

A conversation last night with a friend made me think about one of my personal heroes... Mr. Dennis Ritchie. Along with his coworker Ken Thompson, Ritchie is the father of the C programming language... which makes him father of every modern programming language. If that was not enough, he is also father of the UNIX Operating system and grandfather of Linux. To the uninitiated, that means that all Apple OS X machines, all androids, 90% of internet servers run on Ritchie's operating system. Mr Ritchie died one week after Steve Jobs. Ritchie may have been forgotten by the public but he will always be a hero to me...

Dennis Ritchie the computer scientist that created many of the tools of the modern era of computers was born on September 9, 1941 and was found dead in his home where he lived alone on October 12, 2011. While the world gushed over the loss of Steve Jobs, Ritchie's death garnered little attention. To some deeply involved in the computer community, this seemed terribly unfair. http://www.zdnet.com/blog/perlow/without-dennis-ritchie-there-would-be-no-jobs/19020
Jobs got rich selling computers running the operating system that Ritchie had created, and Gate's fortune is built on the Windows OS believed to be largely written in C, the language that Ritchie wrote.


In case someone didn't get the significance of the "goodbye world" by Ritchie's picture, it is twist on the traditional first program that is always taught in any programming language. In researching this, I decided to find out where the traditional "Hello World" program came from among programmers, and Richie's iconic book may have been one of the first places it was used. Some references claim a version of the first "Hello, World!" program appeared  as part of the documentation for the BCPL programming language. If this is true, Brian Kernighan wrote the first "Hello, World!" program prior to the 1978 printing of the "C Programming Language" by Ritchie and Kernighan. https://en.wikipedia.org/wiki/Hello_world_program Either way, the "Hello World!" best known and loved is the traditional hello world program in ANCI C, Ritchie's language:

#include <stdio.h>

int main(void)
{
    printf("Hello, world!\n");
    return 0;
}

Some quibble about whether a "Hello, World!" traditionally  is written with the first letters capitalized or not, or whether there should be exclamation marks behind it. Never mind all that, Hello World is the first programming accomplishment of thousands, perhaps millions of coders including me. In changing it to "goodbye world", we mournfully commemorate one of the greatest hackers of all times.

It is nearly impossible to imagine a world without C and UNIX. These two innovations along with there numerous derivatives like C++, Objective C, C# and the Linux, BSD, and Android families of operating systems are so pervasive. It could be said that almost all modern programming languages  were derived from C in some sense. 


Bell Labs, Ritchie's employer, still has his homepage posted; I found it to be fascinating and it has many links that any geek will love. 
http://www.cs.bell-labs.com/who/dmr/ Among the links is PDF of the 1972 UNIX manual and many other delightful things. http://cm.bell-labs.com/cm/cs/who/dmr/1stEdman.html Also, Dennis Ritchie's classic book on C is still available through many online sources. http://www.amazon.com/gp/bestsellers/books/3952.

Ritchie's legacy will not vanish quickly, and we can be thankful to have the achievements of Dennis Ritchie to stand on. A wise man said that "If I have seen farther it is because I have stood on the shoulders of giants." More than once it has been said that every one of us stands on the shoulders of Ritchie.

Wednesday, May 15, 2013

Gaining a basic understanding of the Logic of If and If-else statements

Next to while statements, if statements are one of the most important statements that can be made. As we noted in the last post, while statements and if statements control the flow of logic in a statement. This of course is equally important in language as it is in code. This is all well and good, but what do we mean by controlling the flow of logic in a sentence? Well, what I mean is that good logic flows in specific ways, and instead of a linear flow we can control that flow with while loops and if statements. Consider the following linear logic flow.

A ---> B ---> C ---> D

Here, premises A, B, and C all lead to D... but what if I wanted to lead to either D or E? To accomplish that, I would need to use a control structure that would make the logic flow to D if some condition were met, and to E if some other condition were met. Ideally, this might be an If-Else statement. Before showing pseudo code, lets examine our previous example altered to let us


A ---> B ---> C if( condition = true ) ---> D
\           
                                   \-------->   else ---> E

Note how if the condition is not true (~ condition ), then the logic automatically flows to the else. This makes the else the default position of the logic flow. In pseudo code, this is how it looks:

1     if( condition )
2     {
3        statements;
4     }
5     
6     else
7     {
8        statements;
9     }

The other case is a series of if statements.

1       if( condition )
2       {
3          statement_1;
4       }
5     
6       if( condition )
7       {
8          statement_2;
9       }
10     
11     if( condition )
12     {
13      statement_3;
14     }

Note that in the case of  a series of statements and no else at the end, there is no default behavior. Default behavior in a program is the result of else statements, and so if a program has a default behavior, then that should be written as an else. This makes the following syntax the best format for writing a program:


1     if( condition )
2     {
3        optional behavior; 
4     }
5     
6     else
7     {
8        default behavior;
9     }

Conclusion

If and if-else statements are a relatively simple logical structure. Implementing them in code is not very hard to do, but there simplicity belies the power that they bring to life and code.


Monday, May 13, 2013

Understanding the Logic of Looping Structures

One of the subjects that gets taught very early in computer programming is the idea of a Logical loop. Unfortunately, it seems that some people find it difficult to see that looping structures are a very important part of understanding the universe, and in this post, we will try to examine the how and why of looping structures in order to see if we can understand them not just as a method of controlling logic flow in a coded program, but as a way of understanding language, behaviors, neurological processes, etc. I hate to be grandiose and pretend that this is an all important concept, but this in fact is a quite profound idea.

Our first question will be a simple one: What is a logic loop? I think that showing this by some kind of pseudo code is the easiest way to begin. Don't worry if you find this a difficult idea at first... we will attempt to break it down.

while (some_condition = true )
{
     // some action is done.
}

This code snippet (which uses C/C++ syntax) shows that the condition in the parenthesis governs if, and how many times, the statements inside the brackets are done. Before executing the code inside the brackets the very first time, a while loop checks that the condition is true. If the condition is true, then the code between the brackets is executed. When the last statement of code between the brackets is executed, the condition is checked again. If the statement is true, the code continues to be executed starting once again with the first line of code between the brackets. If the condition is not true, the loop is exited. To continue this thought, lets look at two loops where we specify the conditions of the code. Once again, this snippet of pseudo code will uses C/C++ like syntax, however it will not compile. We are using pseudo code for logical clarity, not  real code. We are also not going to specify a data type for our variables, and will be using line numbers so we can follow the ideas in more clarity.

1       x = 5;
2
3       while( x > 0 )
4       {
5           print "Hello John";
6           x = x -1;
7       }

8   
9       // next line of code

Here in this example we first create a variable, 'x', in line 1, and then set it equal to five. We then use the  variable 'x' as the condition of the loop. Remember the syntax for the while statement:

1      while (some_condition = true )

In our example above, the third line is while( x > 0 ). We see that the condition ( x > 0 ) must equal true. If x <= 0, the condition is not true. But, because x = 5 and 5 > 0, then the condition evaluates to true. The loop executes until the condition is false. To see how to control amount of times the loop executes, consider how the below code will work:

1       while( 1 = 1 )
2       {
3           print "Hello John";
4       }

5   
6       // next line of code

I think the above is obvious... 1 will always equal one no matter what so this is an INFINITE loop... it will loop as a long as the program is running. Remember that an infinite loop could also take this form:

1       x = 5;
2
3       while( x > 0 )
4       {
5           print "Hello John";
6       }
7       

8       // next line of code

Do you notice what is missing that would control this statement? The expression to increment the variable 'x'. This expression is found on line 6 of the original code and is ( x = x - 1; ). Here we see that for every loop, the variable x becomes one less than its initial value. (Note, the syntax of C++ allows a shorthand version of the statement  x = x - 1 to be written x = x--;. The name C++ comes because the x = x-- is the decremented form and x = x++; is the increment form).

The website http://www.cplusplus.com/ has some great resources in there tutorials describing control structures in depth. I recommend the following page if you want to better understand the specific syntax for loops in C/C++ http://www.cplusplus.com/doc/tutorial/control/. There are three kinds of loops; while loops, the do-while loop, and the for-loop. Similar control structures are if statements, if-else statements, and switch statements. Below is the basic syntax we showed before for a while loop:

1       x = 5;
2
3       while( x > 0 )
4       {
5           print "Hello John";
6           x = x - 1;
7       }

8       // next line of code

This is the basic syntax for a do-while loop:

1       x = 5;
2
3       do
4       {
5           print "Hello John";
6           x = x - 1;  
7       

8        }while( x > 0 );
9       
10      // next line of code

And finally, is the basic syntax for a for loop:

1       for(  x = 5;  x > 0;  x = x - 1)
2       {
3           print "Hello John";
4       }

5       // next line of code

Notice how the for-loop takes all the statements that control the loop and places them in the same line. While this is more complex to learn, it is ultimately less lines of code and more elegant.

What do we use Loops for?

Why do we need loops? What are they used for? Well, when we program, we are emulating reality, and that is where the value of loops is found. Lets take my favorite example that can be expressed either as code or in a sentence. In a sentence "while I pull Sally's hair, Sally will scream." Below the same in code form.


1       while( I pull Sally's hair )
2       {
3           Sally screams;
4       }


This is similar to the statement "while the car has gas and the engine is turned on, the cars engine will run. Here again, there is a condition ("while the car has gas and the engine is turned on") and a result ("the cars engine will run"). Note though that the condition has an and... this makes a more interesting loop structure. Note that && is the computer code way of expression a logical and.


1       while( ( car has gas ) && (the engine is turned on) )
2       {
3           The engine will keep running;
4       }


Here we see that we have two statements separated by an and. Remember the truth table for an and statement of two variables which we will call p and q in respect to convention:

       p   &   q    Truth value

       T         T            T
       T         F            F
       F         T            F
       F         F            F

This table shows us why a logical and is so special. Only in one case, both premises are true, is the statement true. Thus, when a while statement contains an a logical AND, the statement is quite narrowly defined. Less narrowly defined is the or statement:


       p   OR   q    Truth value

       T           T            T
       T           F            T
       F           T            T
       F           F            F

In a logical or, the statement is true unless both premises are false. That means the difference between an or statement verses an and statement is huge.

Conclusion

In conclusion, we need to look at the ways in which we may encounter loops. In reality we see loops all the time. Consider the following:

"While it is cold, I wear a jacket."

In the above, identify that the action, "I wear a jacket", will be terminated when the condition, "while it is cold", is negated. In logic, a ~ is the symbol used to show negation. So,

 ~(action) --> ~(condition)  which could also be written   NOT(action) --> NOT(condition)               

This means that we can expect that if I am not wearing a jacket, then the weather is NOT cold. This is a simple, but valuable insight. Also note that the use of a while here is appropriate, as I repeatedly don my jacket as long as the weather is cold.

Ultimately, anytime we see a process frequently occurs in reality, then we can expect to see it equally frequently in code. In fact, when coding, anytime a task needs repetition until some condition is either met, or not met, the logic of that task is a loop. This makes understanding loops of primary importance to both programmers and philosophers.

Friday, May 10, 2013

Linux Commands

For several years I have been using Ubuntu Linux and overall have become a real enthusiast. I'm sure some old hats might call me a newbie still, and it is true that I still am learning a lot. In some ways, I feel like it takes 2-3 years to get comfortable enough with Linux to start really enjoying it. Anyways, the other day I started taking notes on the normal, and especially the not so normal tasks I do on the terminal. You know there are some things that I just don't do that often... and when I need to do them, I start to wonder, "How did I do that last time? I know it was easy but I can't remember how to do it!!!"

Well, the solution is to write down the commands, so that I would remember them. This is a kind of self documentation of sorts, and I first started doing this maybe a year ago. I more recently started trying to teach someone Linux, and they needed some basics written down. So I've put several of these together and here it is. Feel free to critique, copy, and edit. This is a work in progress that is made to be saved as a .sh in order to be able to see the markup.

-Cal


# Misc Linux Commands
#
# OS:            Using Ubuntu 12.10 Desktop Version
# Author:      Calvin R. Johnson
# Date:          Last update 5-19-2013
# Credits:      Numerous Internet Sources


# Basic Commands

       # To update run:
       sudo apt-get update
       sudo apt-get upgrade

       # Or run this which does both...
       sudo apt-get update && sudo apt-get upgrade

       # Navigate Through Your Filesystem and Directories

               # To change directories run cd
               cd <'path to file'>
               #example is:
               cd /media/flashdrive/anime

               # To change directories to home, run cd ~

                                cd ~

               # To change directories to root, run cd /

                                cd /

               # To change directories back one directory (towards root) run ..

                                $..

                # To List directories run ls:
                        ls
                        syntax = ls (options)
                                ls -l

                # To clear Terminal

                        clear

                # To close Terminal

                        exit

       #To copy files use cp or rsync

       # To use cp (copy)
       cp /media/flashdrive/anime/picture1.jpg /home/heather/pictures/picture1.jpg

       # Or use rsync to copy o whole directory (folder)
       #syntax is:
       rsync [options] <'source'> <'destination'>
       #example
       rsync -avi /media/flashdrive/anime/ /home/heather/pictures/
       #the above copies directory anime from flashdrive to pictures

       # To install software
       # Using apt-get
       sudo apt-get install <'package'>

                        # Before installing many packages, one must add the source or ppa
                        # You will find the ppa listed in the instructions for installing the package
                                sudo apt-add-repository ppa:<package>
                                # Example of adding ppa
                                sudo add-apt-repository ppa:webupd8team/gnome3
                                # Then update
                                sudo apt-get update
                                # Now install
       sudo apt-get install <'package'>
                        # NOTE
                                #When you add a PPA, a new .list file is created under /etc/apt/sources.list.d/.
                                # The files are named based on the PPA name and your Ubuntu version, like this: "someppa-ppa-oneiric.list".
                               
                                # To edit these PPAs, run:
                                        sudo gedit /etc/apt/sources.list.d/*
                        # To remove a ppa
                               sudo add-apt-repository --remove ppa:someppa/ppa
                        # PPA purge
                                sudo apt-get install ppa-purge
                                sudo ppa-purge ppa:someppa/ppa

                # To Find a file
             
                        find file_name

                # Using Wildcards to help find a file

                                find partial_file_name* # or
                                find *partial_file_name

                        # You can also use the wildcard to list file types

                                find *.mp3 # or any other file extension


#************************************************************************************************
# Linux Networking Commands

        # Look up Information:

                sudo ifconfig
                # in windows, >ipconfig

        # To Release and Renew IP Address:

                sudo dhclient

        # To Restart the Networking Service:
        # Always Restart the Networking Service After Changing Network Configurations

                sudo /etc/init.d/networking restart # also (start, stop)

        # Network Config file
        # To Edit the Network Adapter Configurations

                sudo gedit /etc/network/interfaces

        #To Edit the DNS Resolution File

                sudo gedit /etc/resolv.conf

        #To See Current Hostname

                sudo /bin/hostname

        # Hostname
                #To Echo Hostname

                        sudo /bin/hostname newhostname

                #To Change Hostname

                        sudo /bin/hostname newhostname

        # Ping -- To Determine if You Can See an IP Address

                ping <IP Address>

        # To Determine DNS is Working

                ping <domainname>

        # UFW firewall

                # To Change Default Handling of Ports When UFW is Enabled:

                        sudo ufw default allow/deny

                # To Turn UFW on or Off:

                        sudo ufw enable/disable

                # To Open or Close Ports for Everyone:
             
                        sudo ufw allow/deny port#

                # To Delete a UFW Rule:

                        sudo ufw delete allow/deny port#

                # To Allow Access to All Ports from a Specific IP Address:

                        sudo ufw allow from IP Address

                # To Allow Access to a Specific Port from a Specific IP Address:

                        sudo ufw allow from IP Address to any port port#

        # SSH and FTP
                # SSH -- Secure Shell

                        #Install SSH on Server:

                                sudo apt-get install ssh
                                # SSH Requires Port 22
                                # Use a Terminal Emulator to Connect to the Server (PuTTy)

                        # To check the UFW Firewall
     
                                sudo ufw status

                #FTP -- File Transfer Protocol
                        # Install FTP Server

                                sudo apt-get install vsftpd

                        # Edit vsftpd Configuration Files

                                sudo gedit /etc/vsftpd.conf

                                        #Uncoment
                                                #local_enable=YES to Allow Local Users to Login
                                        #Uncomment
                                                #write_enable=YES to Allow File Uploads

                        # To Restart vsftpd Service:
                                sudo service vsftpd restart

                        # Use an FTP Client to Connect to FTP Server (FileZilla)


#*************************************************************************************#
# Some software installation instructions for Ubuntu 12.10 customisations script
        #Terminal Applications

         # SSH
          sudo apt-get install openssh-server


         # g++ & gcc

          sudo apt-get install build-essential

         # gcc for objective C
         sudo apt-get install gobjc


         # Valgrind
         sudo apt-get install valgrind

         # Python

          sudo add-apt-repository ppa:fkrull/deadsnakes
          sudo apt-get update
          sudo apt-get install python2.6 python2.6-dev


         # Ruby

          sudo apt-get install git build-essential

         # Java
         # sudo add-apt-repository ppa:webupd8team/java
         # sudo apt-get install oracle-java7-install
         # sudo apt-get update
         # sudo apt-get remove oracle-java7-installer

         # R

          gpg --keyserver keyserver.ubuntu.com --recv-key E084DAB9
          gpg -a --export E084DAB9 | sudo apt-key add -
          gksudo gedit /etc/apt/sources.list
          # add this line to the bottom of sources.list
          # deb http://cran.ma.imperial.ac.uk/bin/linux/ubuntu precise/
          sudo apt-get update
          sudo apt-get install r-base

        #GUI Apps
         # gedit

          sudo apt-get install gedit
          sudo apt-get check gedit


          sudo apt-get install gedit-plugins

         # Gmate-gedit (for Ruby on rails developers)
         sudo apt-add-repository ppa:ubuntu-on-rails/ppa
         sudo apt-get update
         sudo apt-get install gedit-gmate


         # SciTE

          sudo apt-get install scite
          sudo apt-get check scite

         # Openoffice/libreoffice

          sudo apt-get install libreoffice
          sudo apt-get check libreoffice

         # startup disk creator

          sudo apt-get install usb-creator-gtk
          sudo apt-get check usb-creator-gtk

         # transmition bit torrent

          sudo add-apt-repository ppa:transmissionbt/ppa
          sudo apt-get update
          sudo apt-get install transmission-gtk
          sudo apt-get check transmission-gtk

         # firefox

          sudo apt-get install firefox

         #  Chrome

         # wget https://dl.google.com/linux/direct/google-chrome-stable_current_i386.deb  #32bit version

          wget https://dl.google.com/linux/direct/google-chrome-stable_current_amd64.deb
          sudo dpkg -i google-chrome*
          sudo apt-get -f install

         # Chromium
  
          sudo apt-get install chromium-browser

         # VLC
       
          sudo apt-get install vlc

         # XBMC
                        sudo add-apt-repository ppa:team-xbmc
                        sudo apt-get update
          sudo apt-get install xbmc

         # Texmacs

          sudo apt-get install texmacs

         # Audacious Music Player

          sudo apt-get install audacious

                #       OpenShot Video Editor
                        sudo add-apt-repository ppa:jonoomph/openshot-edge
                        sudo apt-get update
                        sudo apt-get install openshot openshot-doc

        # Utilities

                # compizconfig-settings-manager
                        sudo apt-get install compizconfig-settings-manager

                # Gparted disk editor
                        sudo apt-get install gparted

                # PPA purge
                        sudo apt-get install ppa-purge
                        #sudo ppa-purge ppa:someppa/ppa

                # Ubuntu Tweak
                        sudo add-apt-repository ppa:tualatrix/ppa
                        sudo apt-get update
                        sudo apt-get install ubuntu-tweak

                # Play encripted DVDs
                        sudo apt-get install libdvdcss2 && sudo /usr/share/doc/libdvdread4/./install-css.sh

                # Extra (Non-Free Codecs)
                        sudo apt-get install non-free-codecs libxine1-ffmpeg gxine mencoder totem-mozilla
                                icedax tagtool easytag id3tool lame   nautilus-script-audio-convert libmad0 mpg321 mpg123libjpeg-prog